Ring doorbells have become a staple in home security, offering real-time video monitoring and two-way communication right from a smartphone. But getting from the box to a functioning doorbell can feel overwhelming if someone’s never worked with low-voltage wiring or smart home apps. The good news? Most Ring models install in under an hour with basic tools, whether the home has existing doorbell wiring or not. This guide walks through the entire setup process, from prepping tools and materials to customizing motion zones and alerts, so homeowners can get their Ring doorbell up and running without calling in help.
Table of Contents
ToggleKey Takeaways
- Most Ring doorbell models install in under an hour using basic tools, whether wired or battery-powered, making professional installation unnecessary for most homeowners.
- Always turn off power at the breaker and verify zero voltage before working with doorbell wiring, and ensure your transformer outputs 16–24V AC for reliable operation.
- Connect your Ring doorbell to a 2.4 GHz Wi-Fi network (not 5 GHz) and keep your router within 30 feet during setup to avoid connection failures.
- Customize motion zones, sensitivity levels, and video recording length in the Ring app to reduce false alerts and optimize performance for your specific home environment.
- Battery-powered Ring doorbells should be mounted 48 inches from the ground for optimal face-height video, while wired models require connecting existing doorbell wiring through the mounting bracket.
- Enable Smart Alerts (with a Ring Protect subscription) to use AI filtering that distinguishes between people, packages, and animals, significantly reducing unnecessary notifications.
What You’ll Need Before Installing Your Ring Doorbell
Gathering everything upfront saves trips to the garage mid-install. The exact tools and materials depend on whether the installation is wired or battery-powered, but most items overlap.
Tools:
- Drill/driver with bits (masonry bit if mounting to brick or stucco)
- Phillips and flathead screwdrivers
- Wire stripper (for wired installations)
- Voltage tester (non-contact type works fine)
- Level (a torpedo level is easier to manage than a 4-footer)
- Pencil for marking
Materials:
- Ring doorbell unit (wired or battery model)
- Mounting bracket and screws (included in the box)
- Wire nuts or connectors (if splicing wires)
- Anchors for drywall, brick, or masonry (usually included, but verify for the mounting surface)
- Smartphone with the Ring app installed (iOS or Android)
- Active Wi-Fi network (2.4 GHz is required: 5 GHz won’t work with most Ring models)
For wired installations:
- Existing doorbell wiring (typically 16–24 VAC from a transformer)
- Doorbell transformer rated 16–24 volts AC (check the existing one: if it’s below 16V, it needs upgrading)
For battery installations:
- Fully charged battery pack (charge it before starting: first-time charges take 5–10 hours)
Most Ring doorbells include a wedge kit or corner kit for angled mounting. Use these if the door sits at an angle or the field of view needs adjustment.
Safety note: Always turn off power at the breaker before working with doorbell wiring, even though it’s low-voltage. Use a voltage tester to confirm the wires are dead before touching them.
Step-by-Step Installation Process
Installing a Wired Ring Doorbell
Wired installations tap into existing doorbell wiring, providing continuous power without battery swaps.
-
Turn off the power. Flip the breaker that controls the doorbell circuit. If the panel isn’t labeled, turn off the breaker, press the old doorbell button, and see if it rings. No sound? That’s the right breaker.
-
Remove the old doorbell. Unscrew the existing doorbell unit and pull it away from the wall. Two wires (usually white and another color) will be attached to screw terminals on the back. Loosen the terminals and disconnect the wires. Don’t let the wires fall back into the wall, tape them to the siding or wrap them around a pencil.
-
Check the transformer voltage. Locate the doorbell transformer (often in the basement, garage, or utility closet near the breaker panel). It should read 16–24V AC. If it’s lower, the Ring doorbell won’t function reliably. Transformers cost $10–$25 and are straightforward to swap, but this requires working inside the electrical panel. If uncomfortable with that, hire an electrician.
-
Attach the mounting bracket. Hold the Ring mounting bracket against the wall where the old doorbell was. Use a level to ensure it’s straight, then mark the screw holes with a pencil. Drill pilot holes (use a masonry bit for brick or stucco), insert anchors if needed, and fasten the bracket with the included screws.
-
Connect the wires. Thread the two doorbell wires through the center of the mounting bracket. Strip about ¼ inch of insulation from each wire if needed. Attach the wires to the screw terminals on the back of the Ring doorbell, polarity doesn’t matter for most models. Tighten the screws until the wires are secure.
-
Attach the doorbell to the bracket. Align the Ring unit with the mounting bracket and press or slide it into place (mechanism varies by model). Most Ring doorbells secure with a bottom screw: tighten it with the included security screwdriver.
-
Restore power. Flip the breaker back on. The Ring doorbell should light up and begin its startup sequence.
Installing a Battery-Powered Ring Doorbell
Battery models install almost anywhere without existing wiring. They’re ideal for homes without doorbell infrastructure or for mounting in unconventional spots.
-
Charge the battery. Insert the battery pack into its charger (included) and plug it into a standard outlet. A full charge takes 5–10 hours on the first go. The battery will have LED indicators showing charge status.
-
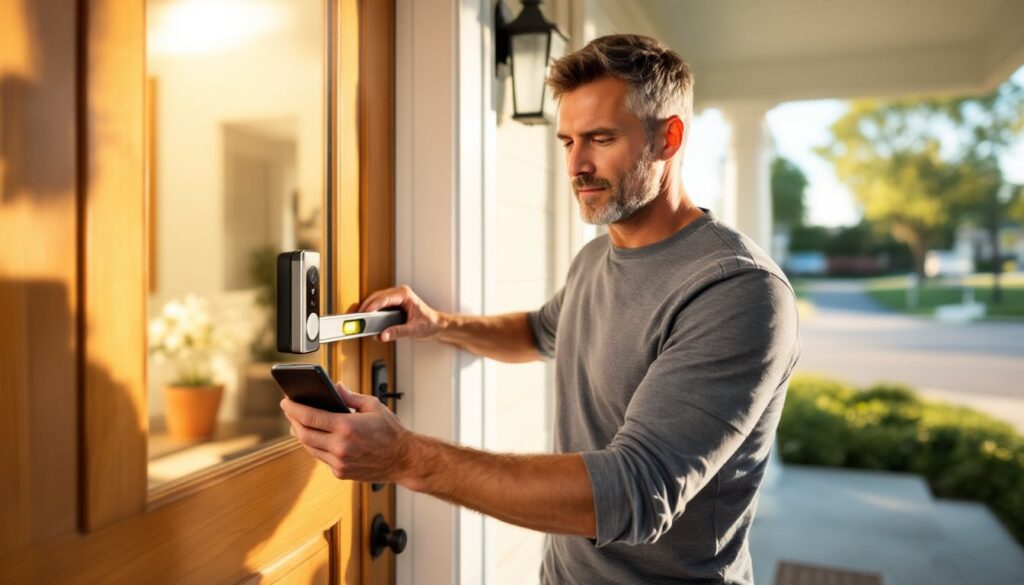
Choose the mounting location. Ring recommends mounting the doorbell 48 inches from the ground for optimal face-height video. Mark the spot with a pencil, then hold the mounting bracket in place. Use a level to confirm it’s straight. Many smart home devices perform best when positioned at manufacturer-recommended heights.
-
Attach the mounting bracket. Mark the screw holes, drill pilot holes (use a masonry bit for brick, stucco, or concrete), insert anchors, and screw the bracket into place. For wood siding or door frames, the included screws usually bite directly without anchors.
-
Insert the battery. Slide the charged battery pack into the back of the Ring doorbell until it clicks. The unit should power on immediately.
-
Mount the doorbell. Align the Ring unit with the bracket and press it into place. Secure it with the bottom security screw using the included tool.
-
Optional: Connect to existing chime wiring. Even battery-powered Ring doorbells can connect to existing doorbell wiring to trigger an indoor chime (if one exists). This doesn’t power the unit but allows the mechanical chime to ring. Follow the wired installation steps for connecting wires, but leave the battery installed. Check the voltage first, anything over 24V AC will damage the doorbell.
Connecting Your Ring Doorbell to the App
The Ring app handles setup, live view, and all settings. Without app connection, the doorbell won’t send alerts or record video.
-
Download the Ring app. Available free on iOS (App Store) or Android (Google Play). Create a Ring account or log in if one already exists.
-
Add a device. Tap the “Set Up a Device” button, then select “Doorbells.” Choose the specific Ring model from the list.
-
Scan the QR code. The app will prompt a QR code scan. It’s printed on the back of the Ring doorbell or on a separate card in the box. Hold the phone’s camera over the code until it registers.
-
Put the doorbell in setup mode. Press and hold the orange button on the back or side of the doorbell until the light on the front starts spinning. This usually takes 15–20 seconds. The spinning light indicates the doorbell is broadcasting its own Wi-Fi network.
-
Connect to the Ring’s Wi-Fi. The app will prompt a jump to phone Wi-Fi settings. Select the network named something like “Ring-Setup-XXX.” Return to the Ring app when connected.
-
Select the home Wi-Fi network. The app will scan for available networks. Choose the home’s 2.4 GHz network (not 5 GHz, Ring doorbells don’t support it). Enter the Wi-Fi password. The doorbell will attempt to connect: this takes 1–2 minutes. If it fails, double-check the password and confirm the router is within range (under 30 feet is ideal during setup).
-
Test the connection. The app will run a quick test of the doorbell’s video feed and internet connection. If the signal strength shows as “Poor” or “Very Poor,” consider moving the router closer or installing a Wi-Fi extender.
-
Name the doorbell. Assign a location name like “Front Door” or “Side Entrance” if multiple Ring devices are in use.
Customizing Your Ring Doorbell Settings for Optimal Performance
Out-of-the-box settings rarely match real-world needs. A few tweaks reduce false alerts and improve response times.
Motion Zones: Ring doorbells detect motion across a wide field, but that often includes sidewalks, streets, or neighboring yards. Open the device settings in the app, tap “Motion Settings,” then “Motion Zones.” Draw boxes around areas that matter, usually the walkway and porch. Exclude high-traffic zones like driveways shared with neighbors. This cuts down on notifications from passing cars or pedestrians.
Motion Sensitivity: Adjust the sensitivity slider under “Motion Settings.” Higher sensitivity catches more movement but triggers more false positives (swaying branches, shadows). Start at the middle setting and adjust after a few days of real-world use. Many homeowners managing home automation setups find trial-and-error works better than guessing upfront.
Motion Frequency: Ring offers “Smart Alerts” (requires a Ring Protect subscription) or standard motion detection. Smart Alerts use AI to differentiate between people, packages, and animals, reducing junk notifications. Without a subscription, use “Regularly” or “Frequently” settings to control how often alerts trigger within a short window.
Video Settings: Adjust “Video Recording Length” (15, 30, 60, or 120 seconds) based on typical visitor behavior. Shorter clips save cloud storage but may cut off before someone leaves the frame. “Live View” settings let users tweak video quality, lower quality uses less bandwidth and connects faster on slower networks.
Chime Settings: If using an indoor Ring Chime or Chime Pro, link it under “Linked Chimes” in device settings. Customize chime tones and volume here. For mechanical chimes (wired installations), toggle “In-Home Chime Type” to match the existing chime (mechanical, digital, or none).
Privacy Zones: Block out areas that shouldn’t be recorded, neighbor’s windows, public sidewalks, etc. Under “Privacy Settings,” tap “Privacy Zones” and draw boxes over sensitive areas. These zones appear black in recordings.
Night Vision: Most Ring doorbells use infrared night vision automatically. No settings needed, but keep the camera lens clean, smudges reduce clarity in low light.
Troubleshooting Common Ring Doorbell Setup Issues
Even straightforward installs hit snags. Here’s how to solve the most frequent problems.
Doorbell won’t power on (wired): Check the transformer voltage with a multimeter or voltage tester. If it reads below 16V, the transformer needs replacing. Also confirm the breaker is on and wires are securely fastened to the screw terminals. Loose connections cause intermittent power.
Won’t connect to Wi-Fi: Ring doorbells only work with 2.4 GHz networks. Many modern routers broadcast both 2.4 GHz and 5 GHz under the same network name. Log into the router settings and create separate SSIDs for each band, then connect the Ring to the 2.4 GHz network. Also check that the router isn’t set to “Wi-Fi 6 only” mode, Ring doorbells need b/g/n compatibility. If the router is over 30 feet away or behind thick walls, signal strength may be too weak. Move the router or add a Wi-Fi extender.
App says “Setup Unsuccessful”: Restart the phone and try again. Also delete the device from the Ring app and start setup from scratch. If the doorbell’s firmware is outdated, it may fail to connect, this usually auto-updates once online, but first-time connections sometimes hang. Press and hold the setup button for 20 seconds to hard reset the unit, then retry.
Mechanical chime doesn’t ring (wired installation): Wired Ring doorbells often require a Ring Chime Kit (included with some models, sold separately otherwise). This small module installs inside the chime box and prevents the chime from humming or failing to ring. Open the chime box (usually mounted on a wall in a hallway or basement), and connect the chime kit per Ring’s included wiring diagram. For detailed guidance, this installation walkthrough covers chime kit wiring in depth.
Battery drains quickly: Cold weather kills battery life, lithium-ion packs lose 20–30% capacity below 40°F. If the doorbell is in a shaded or north-facing location, consider a solar charger accessory or upgrade to a wired model. Also reduce motion sensitivity and shrink motion zones to limit unnecessary recordings, which eat battery.
Video is laggy or low quality: Check the RSSI (Received Signal Strength Indicator) in the Ring app under device health. Anything above -60 dBm is good: -70 or lower means weak signal. Move the router, install a mesh node, or add a Ring Chime Pro (which doubles as a Wi-Fi extender). Also reduce the number of devices streaming on the network simultaneously, Ring doorbells need consistent bandwidth.
Motion alerts aren’t triggering: Verify motion detection is enabled under “Motion Settings” and that motion zones include the area where people approach. Also check “Motion Scheduling”, if someone accidentally enabled a schedule, alerts may be paused during certain hours. Firmware updates occasionally reset settings, so double-check after any app updates.
Most issues resolve with a settings tweak or a quick hardware check. If problems persist after trying these fixes, Ring’s support team can run remote diagnostics through the app.