A kitchen backsplash does heavy lifting. It protects drywall from grease splatter and water damage, defines your design style, and can bump resale value without a full remodel. Whether you’re flipping a rental or finally tackling that builder-grade kitchen, the backsplash is one of the few projects that delivers both function and visual punch. This guide covers practical designs, materials, and installation tips so you can choose a backsplash that fits your skill level, budget, and the way you actually use your kitchen.
Table of Contents
ToggleKey Takeaways
- Kitchen backsplash designs protect drywall from moisture and grease while improving visual appeal and resale value without requiring a full renovation.
- Ceramic and porcelain tile remain the most popular backsplash materials due to durability and heat resistance, with subway tile offering timeless appeal in running bond or modern layouts like herringbone.
- Statement-making backsplash options include slab materials, glass tile, encaustic cement tiles, and metal finishes that serve as kitchen focal points and range from $7–100 per square foot installed.
- Budget-conscious homeowners can use peel-and-stick tiles ($8–20/sq ft), beadboard paneling ($1–3/sq ft), or large-format porcelain panels ($2–6/sq ft) for DIY-friendly installations.
- Proper layout planning and prep work—including clean walls, dry runs, and correct thinset consistency—are essential to successful backsplash installation and long-term durability.
- Caulk joints where tile meets countertops and corners to allow for movement, and seal cement-based grout within a week to prevent staining in high-use kitchen areas.
Why Your Kitchen Backsplash Is More Than Just a Pretty Surface
The backsplash’s primary job is moisture and heat protection. Drywall behind your cooktop and sink takes a beating from steam, grease aerosolization, and the occasional boil-over. Without a backsplash, you’re looking at mold growth, paint failure, and eventual drywall replacement, none of which are cheap.
From a code perspective, most jurisdictions don’t require backsplashes in residential kitchens, but they’re standard practice for good reason. The International Residential Code (IRC) doesn’t mandate them, but it does require moisture-resistant materials in wet areas. A backsplash is your simplest compliance route.
Beyond protection, the backsplash is one of the most visible design elements in a kitchen. It’s eye-level, it frames your workspace, and it’s often the first thing people notice when they walk in. A well-chosen backsplash can unify mismatched cabinets and countertops or serve as the room’s focal point. It’s also one of the few kitchen upgrades you can DIY without major demolition, plumbing reroutes, or electrical work, assuming you’re working with standard drywall and not structural issues.
Timeless Tile Backsplash Designs for Every Style
Ceramic and porcelain tile remain the workhorse materials for backsplashes. They’re durable, heat-resistant, easy to clean, and available in nearly every size, color, and finish imaginable. Porcelain is denser and slightly more stain-resistant than ceramic, but both work well in most kitchens. Standard tile thickness is 1/4″ to 3/8″, which matters when you’re planning your layout around outlets and windowsills.
For traditional or farmhouse kitchens, 3×6″ ceramic subway tile is hard to beat. It’s affordable (often $1–3 per square foot), straightforward to install, and won’t look dated in five years. Larger formats like 4×12″ or 4×16″ subway tiles give a more contemporary feel and mean fewer grout lines to clean.
Mosaic sheets, typically 12×12″ mesh-backed tiles in glass, stone, or ceramic, add texture and visual interest. They work well as accent bands or full backsplashes in modern and transitional kitchens. Installation is faster than individual tiles, but cutting around outlets requires patience and a good wet saw or tile nipper.
Hexagon and arabesque (lantern-shaped) tiles bring pattern without overwhelming a space. They’re often sold in mesh sheets and pair well with neutral cabinetry. Just know that complex shapes mean more grout lines and more cleaning down the road.
Subway Tile: Classic Patterns with Modern Twists
The classic running bond (offset rows) is still the go-to layout, but there are several variations worth considering. Vertical stack bond, tiles aligned in columns, creates a modern, graphic look and works especially well with larger subway tiles. It’s also easier to install since you’re not staggering joints.
Herringbone and chevron patterns add movement and sophistication. Herringbone uses rectangular tiles arranged in a zigzag, while chevron tiles are cut at an angle to form a continuous V. Both require more planning and cutting, so factor in extra time and material waste (usually 10–15% overage). A miter saw with a diamond blade or a quality wet saw is essential for clean cuts.
For a subtle twist, try a 1/3 offset instead of the standard 1/2 offset, or use contrasting grout. Dark grout with white subway tile emphasizes the grid, while matching grout creates a seamless, monolithic look. Epoxy grout is worth the extra cost in high-splash zones, it resists staining and doesn’t require sealing like cement-based grout.
Statement-Making Backsplash Ideas That Wow
If you want the backsplash to be the star, go bold with material, color, or pattern. Slab backsplashes, a single piece of quartz, marble, or porcelain extending from counter to cabinets, deliver a high-end, seamless look. There are no grout lines to clean, and the veining or pattern flows uninterrupted. Installation requires a fabricator and usually runs $40–100 per square foot installed, but it’s a clean, modern solution that works especially well behind cooktops.
Glass tile offers translucency and color depth that ceramic can’t match. It’s heat-resistant, non-porous, and easy to wipe down, though it shows water spots more readily. Expect to pay $7–30 per square foot depending on size and finish. Cutting glass tile requires a wet saw with a glass blade and a light touch, too much pressure and you’ll crack it.
Encaustic cement tiles bring pattern and color in one shot. These handmade tiles feature pigmented patterns (not surface glazes), so they wear well and add serious character. They’re porous, though, so sealing is non-negotiable, and they’re not ideal directly behind a cooktop where grease buildup is heavy. Designers on Remodelista often showcase these in eclectic and Mediterranean-style kitchens.
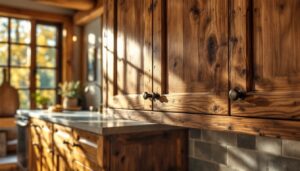
Metal backsplashes, stainless steel sheets, copper tiles, or tin ceiling panels, fit industrial and contemporary kitchens. Stainless is practical and matches most appliances, but it shows fingerprints and scratches. Copper develops a patina over time, which some love and others hate. Both are fire-resistant and easy to clean with the right products (avoid abrasive cleaners that scratch the finish).
Budget-Friendly Backsplash Materials for DIY Enthusiasts
You don’t need a four-figure budget to upgrade a backsplash. Peel-and-stick tile, vinyl or gel-based products that mimic ceramic, glass, or stone, can be installed in an afternoon with no thinset, grout, or special tools. Quality has improved significantly: some products are heat-resistant up to 140°F and hold up well in rentals or temporary upgrades. Expect to pay $8–20 per square foot. They won’t last as long as real tile, but they’re removable and a solid stopgap if you’re not ready for a full renovation.
Beadboard or shiplap paneling installed behind the stove or sink adds texture and cottage charm for $1–3 per square foot in materials. Use PVC or primed MDF beadboard in moisture-prone areas, not raw wood. Paint with a semi-gloss or high-gloss finish for easier cleaning. This approach works best in farmhouse or coastal kitchens and pairs well with open shelving.
Painted drywall with a high-gloss or semi-gloss finish is the cheapest option, essentially free if you already have paint. It’s not as durable as tile, but it’s cleanable and can be refreshed easily. Use a stain-blocking primer first, especially if you’re covering old grease stains. This works for low-splash areas or if you’re planning a bigger remodel down the road and don’t want to invest in tile yet.
For a middle-ground option, consider large-format porcelain panels (often 12×24″ or larger). Fewer pieces mean faster installation and less grout. These run $2–6 per square foot and are widely available at big-box stores. A simple running bond layout keeps cuts minimal, and you can often complete a standard backsplash in a weekend.
How to Choose the Right Backsplash for Your Kitchen Layout
Start by assessing your kitchen’s existing elements. If you have busy countertops, granite with heavy veining, for example, a simple, solid-color backsplash avoids visual overload. Conversely, if your counters and cabinets are neutral, the backsplash is your chance to introduce pattern or color.
Consider the height and span. Standard backsplash height is 4 inches (just a short splash guard) or 18–20 inches (full coverage to the underside of upper cabinets). Full-height backsplashes are more common now and offer better protection and a cleaner look. If you have open shelving or no upper cabinets, you can extend tile higher or create a feature wall.
Around a cooktop or range, extending tile to the hood or ceiling creates a focal point and protects the wall from heat and grease. This is a good spot for accent tile, a different color, pattern, or material, to break up a large expanse.
Factor in outlets, switches, and windows. You’ll need to cut tile around these, so simpler tile shapes and larger sizes reduce the number of fussy cuts. If you’re not confident with a wet saw, stick to straight cuts and right angles. For complex layouts, a tile scribe or snap cutter can handle small notches, but intricate work around outlets may require a tile nipper or angle grinder with a diamond blade.
Browsing real-world examples on Houzz or similar platforms can help visualize how different materials and patterns work with various cabinet styles and lighting conditions.
Installation Tips Every Homeowner Should Know
Prep work makes or breaks the project. Walls must be clean, dry, and flat. Scrape off any old caulk, grease, or loose paint. If the wall is glossy, scuff it with 80-grit sandpaper to help thinset bond. Fill any holes or divots with joint compound and let it cure fully, wet patches will telegraph through thin tile.
Lay out your tile dry before mixing any thinset. Use a level and a straightedge to mark your starting line (usually the countertop or a level batten board if the counter isn’t level). Plan your layout so cut tiles fall in less visible areas, next to the fridge or at the ends of runs, not centered over the sink. A laser level is handy but not required: a 4-foot spirit level works fine.
Use the right thinset. For most ceramic and porcelain tile, a white polymer-modified thinset is your best bet. It bonds well to drywall and cement board, has some flexibility, and won’t show through light-colored tiles. Mix to a peanut butter consistency, thick enough to hold trowel ridges, but not so stiff it’s hard to spread. A 1/4″ × 1/4″ square-notch trowel is standard for most wall tile.
Apply thinset in small sections (about 2–3 square feet) so it doesn’t skin over before you set tile. Hold the trowel at a 45-degree angle to create even ridges, then press tile firmly with a slight twist. Use tile spacers (1/16″ or 1/8″ depending on your look) to keep grout lines consistent.
Safety gear: Wear safety glasses when cutting tile, shards fly. A dust mask or respirator is essential when mixing thinset or cutting, especially if using a grinder. Gloves protect your hands from the alkaline bite of wet thinset and grout.
Let thinset cure for 24–48 hours before grouting. Rushing this step can cause tiles to shift or grout to crack. When grouting, use a rubber float held at a 45-degree angle, pressing grout firmly into joints. Wipe diagonally across tiles with a damp sponge to avoid pulling grout out of joints. Expect to wipe multiple times, haze will reappear as grout dries.
Seal grout (if using cement-based grout) after it cures for about a week. Penetrating sealers are easy to apply and protect against staining. Kitchens highlighted on The Kitchn often emphasize the importance of proper sealing for longevity, especially in high-use areas.
Caulk the joint where tile meets the countertop and the inside corners. Grout is rigid and will crack at these movement joints, caulk flexes. Use a color-matched silicone or latex caulk and tool it smooth with a wet finger or caulk tool.
If you’re uncomfortable with wet saws or have a lot of complex cuts, most tile shops and big-box stores offer cutting services for a small fee. It’s worth it to avoid botched cuts and wasted material.